You are using an out of date browser. It may not display this or other websites correctly.
You should upgrade or use an alternative browser.
You should upgrade or use an alternative browser.
‘96 Kona Kilauea (was ‘95 “Kilueua”)
- Thread starter arnomatic
- Start date
I got a cheap Chris Kong from Aliexpress and its got the bling factor of CK and costs about as much as a bag of chips from my local Turk. Works fine, all headsets do really. I have real CK and they're virtually no better than my cheap KongBut why a fake Chris King?
Overpriced piss in the same category as Paul's components which I've also sadly wasted my money on in the past
pw_pw_la
Senior Retro Guru
Hmmmmm.
I'm not sure I fully agree.
But only because it's basically all overpriced piss, isn't it?
Down for a cheap basic headset when required, but I'd rather it have no branding, or it's own branding, than the knockoff kind!
Also, all headsets other than Mickey headsets are now worthless.
I'm not sure I fully agree.
But only because it's basically all overpriced piss, isn't it?
Down for a cheap basic headset when required, but I'd rather it have no branding, or it's own branding, than the knockoff kind!
Also, all headsets other than Mickey headsets are now worthless.
I'm not advocating for counterfeit, and do discourage the practice of nicking designs, but I admit I couldn't care less when it comes to brands that are deliberately chancers. CK headsets are great but they're not that great, which I don't think anyone would disagree with. I bought the Kong headset as a bit of a joke, it is about equal in quality to a basic Ritchey headset - it does the job.Hmmmmm.
I'm not sure I fully agree.
But only because it's basically all overpriced piss, isn't it?
Down for a cheap basic headset when required, but I'd rather it have no branding, or it's own branding, than the knockoff kind!
Also, all headsets other than Mickey headsets are now worthless.
Here's the headset, took about two weeks to arrive so fairly quick from AliX.Looking good so far... Where's the fake from?
I think this was a big factor. If the bearings were rotating hundreds of times a minute, I might look to get something higher quality, more durable. But a headset moves through a very small window of rotation on a standard ride, maybe a little more on something technical. For my purposes, I wouldn't want to spend any more than I have.Works fine, all headsets do really.
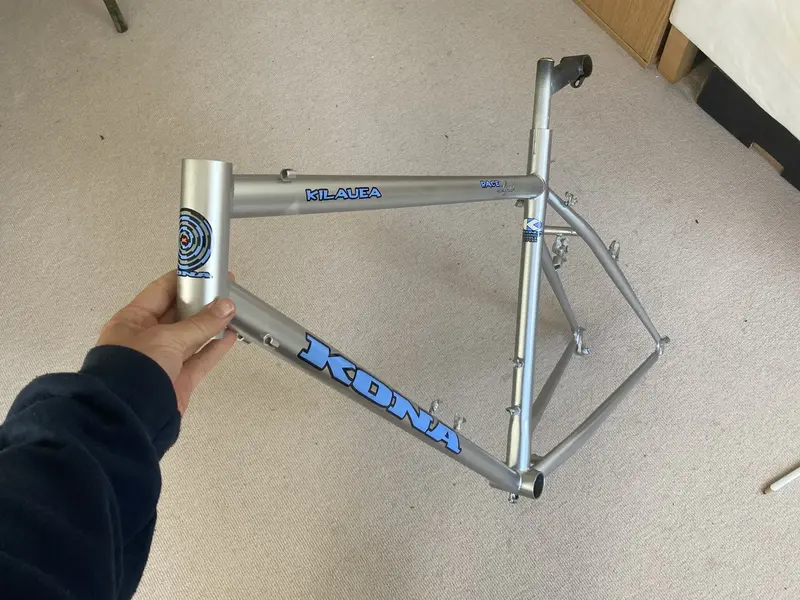
Decals went on a treat. I got mine form H Lloyd cycles, before hearing about the forum favourite source: Gil. The decals are great, they seem very high quality. I marked the centre line of the decals, then used tape to mark position and centreline of each tube before slicing the decals down. I've applied a couple of decals before that have looked 1 or 2° out and you can never unsee it. I thought if I was clearing over these, I best get it right.


I couldn't see on any '96 Kilauea where the Chromoly Double Butted sticker should go, they all seemed to have a different tubing decal at the top of the seat tube. In my haste to finish the stickers before heading to work, I put it where a tubing sticker might usually go. I think it looks great, but maybe other users might have some insight into where it should go? (Not that I'm going to move it now).
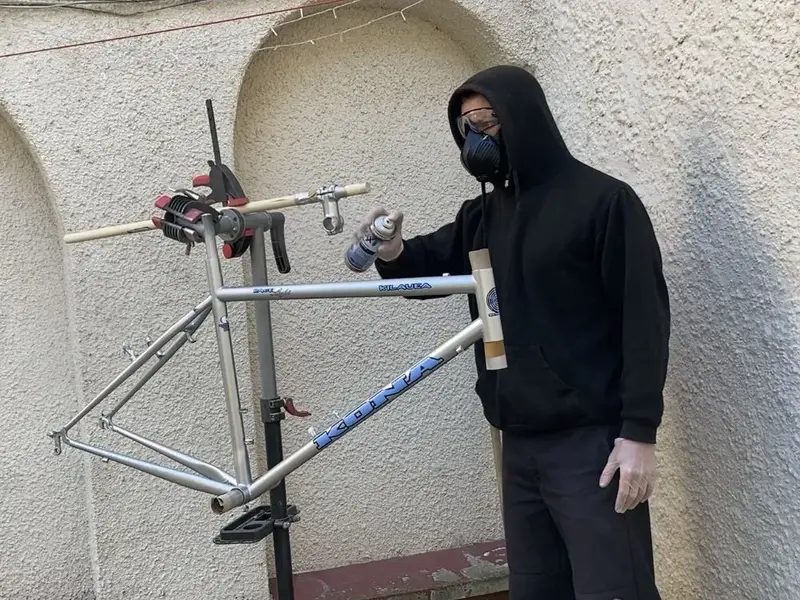
After wiping the frame down with my DIY IPA solution, I went onto using SprayMax 2K clear over the frame and the stem. The stem was an afterthought, but I wanted a silver stem and thought I might as well paint it while I had the materials. The 2K is great, but not as thick as I'd expected. I hoped to do a few coats, let it cure, sand over the decals to flat it and then apply another coat. But I wasn't confident there would be enough in the can so put it all on at once. Here's me "PPE'd" up.

After a can of clear had gone on (and a fly had been badly removed from the seat tube with my finger), I let the frame cure for 24 hours. The next day I wet sanded the frame with 1200 grit, then passed over it again with 2000 before polishing with Meguiars cut and polish. I'm not sure if it was the best choice, I just had some left over in a jar and thought it was probably my best shot without taking yet another trip down the hill to Halfords.
Other than going a little hard on the sanding over the drive side decals (and a seat stay) the frame turned out better than expected. In certain lights on some harder to reach areas, the colour from the primer is a little visible. I guess that's what you can expect painting in a poorly lit, and at times windy, patio area. I guess the paint and flake from the Montana can don't travel the same in the wind. My tip for anyone doing this in the future would be to BE CAREFUL with sanding. Take it slow, with light pressure, and wipe down ares to check them periodically. Not all tubes will take as much paint as others.
These are minor details, and as a whole the frame looks fantastic. Famously, paint jobs don't always photograph well, so I've tried to attach a couple of videos for visual effect. I'll be building the bike up soon, but I need to find a few more bits before it's complete. Bikes can get pricey once you try and make them nice all over.
While I didn't repaint the P2 forks, I did give them the same wet sand and polish treatment, and they've come up really nicely.


I couldn't see on any '96 Kilauea where the Chromoly Double Butted sticker should go, they all seemed to have a different tubing decal at the top of the seat tube. In my haste to finish the stickers before heading to work, I put it where a tubing sticker might usually go. I think it looks great, but maybe other users might have some insight into where it should go? (Not that I'm going to move it now).
After wiping the frame down with my DIY IPA solution, I went onto using SprayMax 2K clear over the frame and the stem. The stem was an afterthought, but I wanted a silver stem and thought I might as well paint it while I had the materials. The 2K is great, but not as thick as I'd expected. I hoped to do a few coats, let it cure, sand over the decals to flat it and then apply another coat. But I wasn't confident there would be enough in the can so put it all on at once. Here's me "PPE'd" up.

After a can of clear had gone on (and a fly had been badly removed from the seat tube with my finger), I let the frame cure for 24 hours. The next day I wet sanded the frame with 1200 grit, then passed over it again with 2000 before polishing with Meguiars cut and polish. I'm not sure if it was the best choice, I just had some left over in a jar and thought it was probably my best shot without taking yet another trip down the hill to Halfords.
Other than going a little hard on the sanding over the drive side decals (and a seat stay) the frame turned out better than expected. In certain lights on some harder to reach areas, the colour from the primer is a little visible. I guess that's what you can expect painting in a poorly lit, and at times windy, patio area. I guess the paint and flake from the Montana can don't travel the same in the wind. My tip for anyone doing this in the future would be to BE CAREFUL with sanding. Take it slow, with light pressure, and wipe down ares to check them periodically. Not all tubes will take as much paint as others.
These are minor details, and as a whole the frame looks fantastic. Famously, paint jobs don't always photograph well, so I've tried to attach a couple of videos for visual effect. I'll be building the bike up soon, but I need to find a few more bits before it's complete. Bikes can get pricey once you try and make them nice all over.
While I didn't repaint the P2 forks, I did give them the same wet sand and polish treatment, and they've come up really nicely.
Last edited:
If the Imgur videos aren't working, click this link and it'll take you to a folder of them!
Dr. FatChance
Retro Newbie
This is awesome! and thanks for sharing your steps through the paintjob process
Similar threads
- Replies
- 23
- Views
- 859
- Replies
- 4
- Views
- 225
- Replies
- 10
- Views
- 1K
- Replies
- 3
- Views
- 423