For Sale 1988 (I think) Fisher Hoo Koo e Koo (blue, 19")

Well, brazing is fairly easy to kit out, and a lot more tolerant of inexperience than welding. Mistakes can be undone, or rectified, or hidden, or tidied up a lot easier than welded ones.

No need for a framebuilding course, but there might be something available at local Technical College or High School, but metalworking courses are getting pretty rare, and within that brazing itself is pretty niche these days. There are some specific brazing courses around, such as this at Weldspace in Plymouth. Where are you based?
Many have relied on YouTube (Fillet and capilliary, but not HVAC, copper or aluminium brazing), and lots of practice to get confident enough.

Apart from basic workshop tools (Vice, emery cloth, hacksaw and files etc) the main thing you need a decent heat source. The standard option is oxy-acetylene welding torch, but brazing is also possible with the more friendly oxy-propane or oxy-propylene/pro-fuel set up. It's slightly lower temp and needs special regulators and nozzles on the torch, but is safer than Oxy-Acetylene, and does not usually screw up your house insurance.
OA kits can be hired (https://www.nationaltoolhireshops.co.uk/product/oxy-acetylene-kit-hire/) less bottles, but another £30 above the weekly rate would buy a kit to own, the Acetylene regulator and the nozzle would need to be changed out if you went with Profuel or propane.

Gas of all sorts can be sourced rent-free from HobbyWeld or SGS, who both have distributors all over. Cost for the 2 bottles would be around £150 + £200 bottle deposit.

A suitable seat tube can be bought from specialist suppliers (Ceeway) for £10-30 depending on spec and steel alloy, along with bronze filler and flux to match. Ceeway also sell practice kits of plain tubes and lugs. Peter at Ceeway also sells some sleeving tube 28.6mm internal diameter, which could be formed into an external sleeve for the existing seat tube.

Do you have a good pic of the seat lug area?

All the best,
 
Last edited:
Well, brazing is fairly easy to kit out, and a lot more tolerant of inexperience than welding. Mistakes can be undone, or rectified, or hidden, or tidied up a lot easier than welded ones.

No need for a framebuilding course, but there might be something available at local Technical College or High School, but metalworking courses are getting pretty rare, and within that brazing itself is pretty niche these days. There are some specific brazing courses around, such as this at Weldspace in Plymouth. Where are you based?
Many have relied on YouTube (Fillet and capilliary, but not HVAC, copper or aluminium brazing), and lots of practice to get confident enough.

Apart from basic workshop tools (Vice, emery cloth, hacksaw and files etc) the main thing you need a decent heat source. The standard option is oxy-acetylene welding torch, but brazing is also possible with the more friendly oxy-propane or oxy-propylene/pro-fuel set up. It's slightly lower temp and needs special regulators and nozzles on the torch, but is safer than Oxy-Acetylene, and does not usually screw up your house insurance.
OA kits can be hired (https://www.nationaltoolhireshops.co.uk/product/oxy-acetylene-kit-hire/) less bottles, but another £30 above the weekly rate would buy a kit to own, the Acetylene regulator and the nozzle would need to be changed out if you went with Profuel or propane.

Gas of all sorts can be sourced rent-free from HobbyWeld or SGS, who both have distributors all over. Cost for the 2 bottles would be around £150 + £200 bottle deposit.

A suitable seat tube can be bought from specialist suppliers (Ceeway) for £10-30 depending on spec and steel alloy, along with bronze filler and flux to match. Ceeway also sell practice kits of plain tubes and lugs. Peter at Ceeway also sells some sleeving tube 28.6mm internal diameter, which could be formed into an external sleeve for the existing seat tube.

Do you have a good pic of the seat lug area?

All the best,
I'm based in Perth, almost as far from plymouth as you can get unfortunately! Still I may have a look around for such a course. Having said that I don't mind messing up a few times to learn it.

It's good to know there are viable alternatives to acetylene also, that was one of the more intimidating factors.
Seems like the setup cost isn't too prohibitive so I guess I'll put my pennies away and invest in a few months.

Thanks a lot for taking the time to share all that info by the way, there's a lot of moving parts and that really helped clarify things.

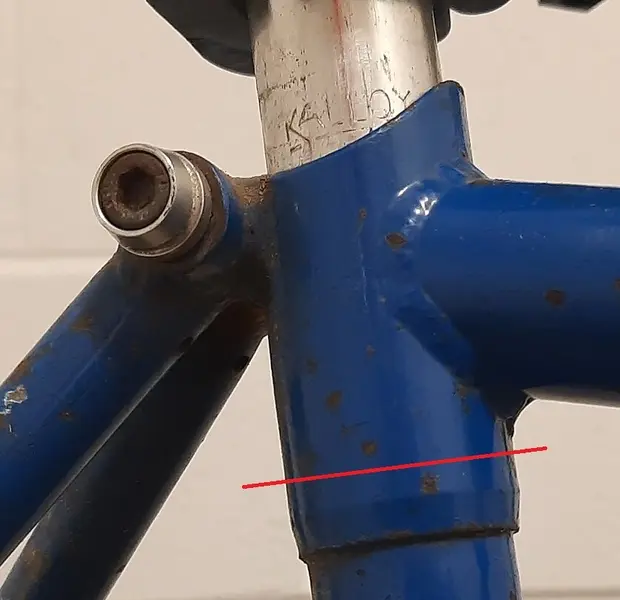
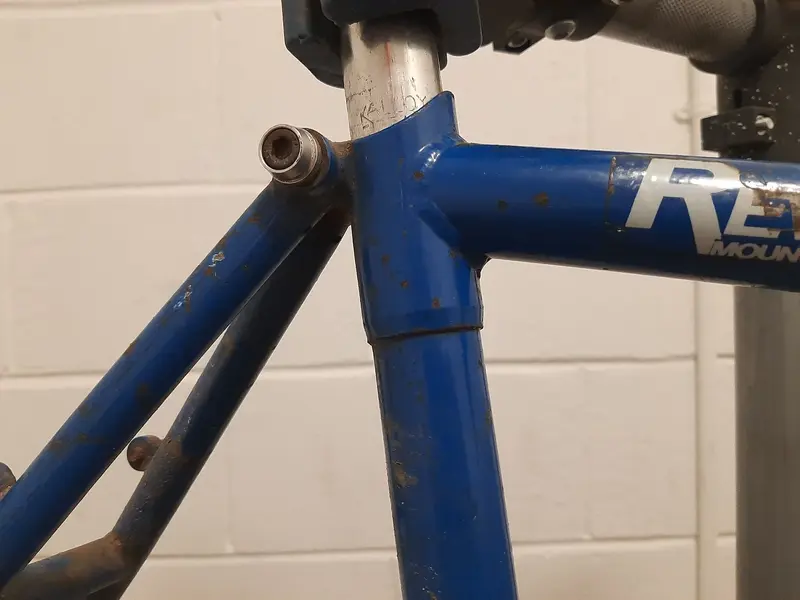
That's the top of the seat tube, I'm guessing with enough heat the old tube could be slid out.
The problem would be getting a new one in, since the tube has been pressed flat at the bottom where it meets the bb. You'd almost have to get it in, then form it in situ.

20240723_215319.jpg
 
Yes, sadly brazing only a small part of part of City and Guilds #3268 (Welding Skills) and nothing in NVQs, so it's pretty rare to find tuition other than small copper pipework for the Refrigeration/AirCon industry, and almost no stand-alone training for it.

Worth a look inside the seat lug. The overlap may not be as big as you think...
I suspect that the actual seat tube only goes in a small amount. There's likely a machined shoulder about 1cm up inside the lug where the seat tube butts up. A line of brass should be visible there.

20240723_215319.jpg

Alternatively, clean the paint off an area of the top of the seat lug back to metal. If there are two concentric rings with a line of brass between, then the actual tube runs all the way through. If it's just one solid thick tube of steel then...

Traditionally, on a fully brazed frame, the seat tube would run all the way through the seat lug. The top end would then be cut down and finished off with files after brazing. The Fisher arrangement gives a really thick walled section at the top where the welding is (to prevent distortion, and the need to ream after construction), and the square cut seat tube saves on finishing work. It's a classic volume production solution.

If there is only a small overlap with the lug, then it would make removing the old tube easy (less to heat). Cut the tube to a short stub, load with a weight and heat the bottom edge of the lug until gravity pulls the tube stub out. Tubes shouldn't be peeled or pulled too hard, since that can rip both the tube and the lug. Also, given the shorter overlap, a new tube could be prised in from below.

There's a framebuilding show in Glasgow in a couple of weeks...might be able to tap up someone there for some casual instruction? https://www.brazin-scotland.com/. One of their exhibitors listed for a couple of years is the Scottish Frame Builder Workshop, which sounds useful, but I can find no other reference or links to them.🤔

All the best,
 
Last edited:
Yes, sadly brazing only a small part of part of City and Guilds #3268 (Welding Skills) and nothing in NVQs, so it's pretty rare to find tuition other than small copper pipework for the Refrigeration/AirCon industry, and almost no stand-alone training for it.

Worth a look inside the seat lug. The overlap may not be as big as you think...
I suspect that the actual seat tube only goes in a small amount. There's likely a machined shoulder about 1cm up inside the lug where the seat tube butts up. A line of brass should be visible there.

View attachment 870463

Alternatively, clean the paint off an area of the top of the seat lug back to metal. If there are two concentric rings with a line of brass between, then the actual tube runs all the way through. If it's just one solid thick tube of steel then...

Traditionally, on a fully brazed frame, the seat tube would run all the way through the seat lug. The top end would then be cut down and finished off with files after brazing. The Fisher arrangement gives a really thick walled section at the top where the welding is (to prevent distortion, and the need to ream after construction), and the square cut seat tube saves on finishing work. It's a classic volume production solution.

If there is only a small overlap with the lug, then it would make removing the old tube easy (less to heat). Cut the tube to a short stub, load with a weight and heat the bottom edge of the lug until gravity pulls the tube stub out. Tubes shouldn't be peeled or pulled too hard, since that can rip both the tube and the lug. Also, given the shorter overlap, a new tube could be prised in from below.

There's a framebuilding show in Glasgow in a couple of weeks...might be able to tap up someone there for some casual instruction? https://www.brazin-scotland.com/. One of their exhibitors listed for a couple of years is the Scottish Frame Builder Workshop, which sounds useful, but I can find no other reference or links to them.🤔

All the best,
That's really interesting about the seat tube lug actually, never would have guessed that.
Would be useful if it was the case as I'd be a bit worried about damaging the stays where they attach the the lug, that looks to be brazed on too. I'll take a look when I get a chance.

Thanks so much for going into the details there as well, even if I can't fix it I've still learned a lot!
Would never have thought to weight the tube, would have just tried to wrench it out if I was going on instinct.

I did see the advert for that show a couple of days ago actually, looks to be some interesting builders in attendance so might try to get out of my responsibilities and head along to pester them.

Cheers again @danson67 !
 

Latest posts

Back
Top