You are using an out of date browser. It may not display this or other websites correctly.
You should upgrade or use an alternative browser.
You should upgrade or use an alternative browser.
1950? Jim Guard of Southampton project
- Thread starter quiet mike
- Start date
scooter
Retro Guru
I managed to remove a single sided freehub before,
I used a vice and two pieces of flat hard wood, then tightened up on the edges of the hub.
The wood will reduces the damage to the hub, if I remember rightly I think a may of heated it up also with a soldering blow torch, then when then hub cools back down I managed to free it with the correct tool.
I had to keep tighteneing the vice gradually as it tended to slip when adding pressure with the removal tool.
You should be able to do the same with your hub but obviously you will need to cut two pieces of wood that are wide enough and thick enough so they fit in between the cogs and push onto each flange, not the cogs.
Also it may help if you use a strong tube (piece of scaffold) around 18" that slips over the socket or spanner (whichever you use?) so you can get better leverage.
Try it without heat first, but I think you will need to eventually add heat as they really do hang on , especially as its been locked on for x amount of years.
I found that mine released as it cooled back down (when the metals were shrinking back)
Ps, you will get smoke because of all the oil and grease inside but it wont do any harm and can all be cleaned and re-greased once removed.
Good luck with this..
quiet mike
Devout Dirtbag
Thanks for the advice chaps. I managed to free it all off last night. I didn't have a chain whip (I don't know why after tinkering with bicycles for 15 odd years ...) so sourced this rather funky Cyclo one on ebay last week for a quid. 
To start with I just made a wooden collar for the hub and whacked it in the vice and gave it some welly. Rather than free off the three speed, that unlocked the fixed cog that was in the vice. Took me a while to work out that the locking ring, and the fixed cog, were on opposite threads ...
Anyway, with that out of the way I could secure the hub horizontally in the vice between two chocks of wood. It took a while, but eventually just from regular sharp taps with the hammer on the chain whip, I eventually freed off the three speed. (I'd had to weld this solid, as it was so worn it no longer locked into drive. It freewheeled both directions :? )

Siezed hub vanquished by zombikombi1959, on Flickr
Anyway, all in bits now. I've also identified the hub. I could just make out a logo on the hub, but the chrome had worn off and it was very faint. I didn't recognise it. Once the fixed cog was off it revealed the name 'GNUTTI'. I had not heard of them before but after a little digging >
http://www.classicrendezvous.com/Italy/Gnutti_main.htm

The spindle appears straight, but one of the cones is pretty pitted. I'm not sure I can recycle it yet on the Jim Guard. Also the hub has lost 90% of it's chrome and looks pretty beat.
To start with I just made a wooden collar for the hub and whacked it in the vice and gave it some welly. Rather than free off the three speed, that unlocked the fixed cog that was in the vice. Took me a while to work out that the locking ring, and the fixed cog, were on opposite threads ...
Anyway, with that out of the way I could secure the hub horizontally in the vice between two chocks of wood. It took a while, but eventually just from regular sharp taps with the hammer on the chain whip, I eventually freed off the three speed. (I'd had to weld this solid, as it was so worn it no longer locked into drive. It freewheeled both directions :? )

Siezed hub vanquished by zombikombi1959, on Flickr
Anyway, all in bits now. I've also identified the hub. I could just make out a logo on the hub, but the chrome had worn off and it was very faint. I didn't recognise it. Once the fixed cog was off it revealed the name 'GNUTTI'. I had not heard of them before but after a little digging >
http://www.classicrendezvous.com/Italy/Gnutti_main.htm

The spindle appears straight, but one of the cones is pretty pitted. I'm not sure I can recycle it yet on the Jim Guard. Also the hub has lost 90% of it's chrome and looks pretty beat.
quiet mike
Devout Dirtbag
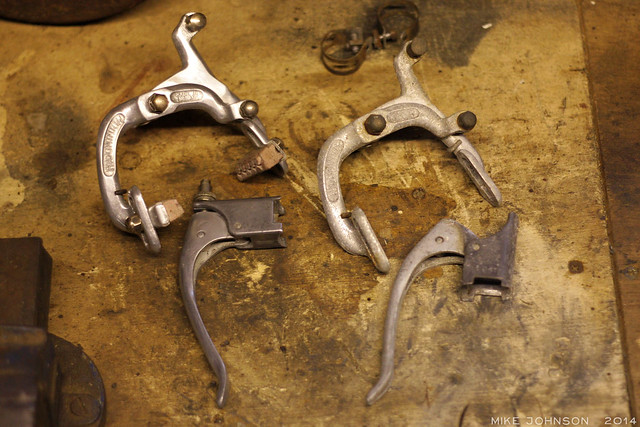
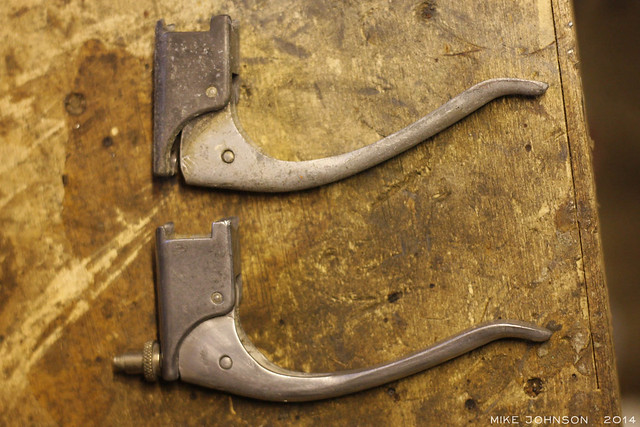
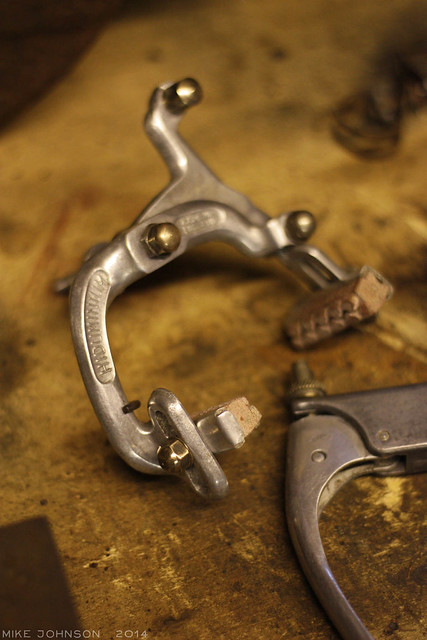
Well, this machine is overdue some TLC. Thought I'd start with the easy bits, and stripped down and cleaned the GB Hiduminium brake calipers and levers.
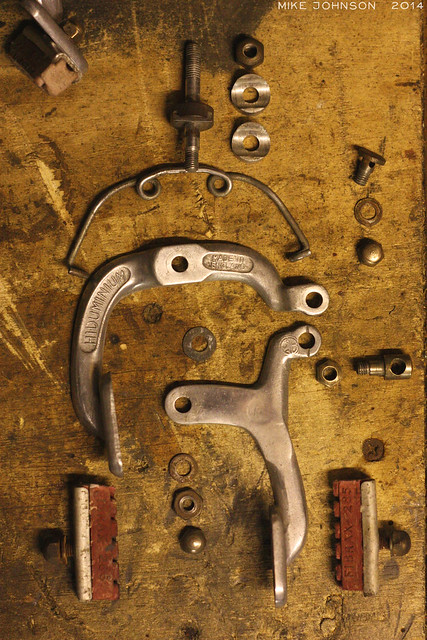
Everything came apart easily, and even better, it all looks original and complete. Canvas cable housings are toast, but they won't be difficult to replace. Even the red Fibrax brake blocks look proper vintage!
Just scrubbed away with some fine wire wook and some metal polish for a couple of hours in the evening.

Front and rear Hiduminuim brakes by zombikombi1959, on Flickr

GB Hiduminium brake levers by zombikombi1959, on Flickr

GB Hiduminium dissected by zombikombi1959, on Flickr

GB Hiduminium brake caliper by zombikombi1959, on Flickr
Everything came apart easily, and even better, it all looks original and complete. Canvas cable housings are toast, but they won't be difficult to replace. Even the red Fibrax brake blocks look proper vintage!
Just scrubbed away with some fine wire wook and some metal polish for a couple of hours in the evening.

Front and rear Hiduminuim brakes by zombikombi1959, on Flickr

GB Hiduminium brake levers by zombikombi1959, on Flickr

GB Hiduminium dissected by zombikombi1959, on Flickr

GB Hiduminium brake caliper by zombikombi1959, on Flickr
quiet mike
Devout Dirtbag
Re:
Some great info on the Jim Guard shop from an old employee, who worked there towards the end of it's history.
http://sussexhistoryforum.co.uk/index.php?topic=5531.0
Some great info on the Jim Guard shop from an old employee, who worked there towards the end of it's history.
http://sussexhistoryforum.co.uk/index.php?topic=5531.0
quiet mike
Devout Dirtbag
Slowly coming together ... hoping to have it up and running for l'Eroica Britannia next week ... :shock:
Picked up a set of later Weinmann alloy wheels, handily the rear has a three cog cassette, which will get me up and running, but I have a set of earlier Dunlop alloy rims in the wings ready to go on a pair of Bayliss Wiley hubs when I can find time to build them.

Picked up a set of later Weinmann alloy wheels, handily the rear has a three cog cassette, which will get me up and running, but I have a set of earlier Dunlop alloy rims in the wings ready to go on a pair of Bayliss Wiley hubs when I can find time to build them.

Diamant_Don
Retro Guru
Re:
Loving this thread - that's a lovely looking beast! Can we see finished pics before l'eroica?
Loving this thread - that's a lovely looking beast! Can we see finished pics before l'eroica?
Similar threads
- Replies
- 26
- Views
- 5K
- Replies
- 7
- Views
- 2K