Scanning and 3D printing impossible to find vintage parts

No it's just a plastic bung type that pushes in, over the years I think most fell out and got lost.

https://www.retrobike.co.uk/threads/top-cap-bung-for-a-1-1-8”-kona-velocity-stem.382865/

Apologies for jumping into a road bike section with MTB stuff but I thought this was an interesting topic.
 
No it's just a plastic bung type that pushes in, over the years I think most fell out and got lost.

https://www.retrobike.co.uk/threads/top-cap-bung-for-a-1-1-8”-kona-velocity-stem.382865/

Apologies for jumping into a road bike section with MTB stuff but I thought this was an interesting topic.
I just had a look, it's true almost all used velocity stems are missing the cap.
To reproduce one of those you wouldn't need a 3D scan, you'd just need some accurate measurements and some clear photos of a surviving cap of the top, side and rear views. With that you can easily model a cap that looks the part, then print it in flexible TPU filament.
You could also improve the tolerances so that it becomes a tighter fit
 
Wine cork?
That's actually a good idea if it fits (you could sand it down until it does if it's too big)
You could then model a cap using some black Fimo modelling clay, carefully creating the right shape with your fingers. Once it looks good, you can heat it up with a hair dryer until it hardens, then remove it and stick it onto the cork with some epoxy glue.

I did this to fill in my Scott Foil internal gear cable guides which had become unnecessary because I fitted wireless SRAM Etap gears, it looks much neater.
 
001.JPG

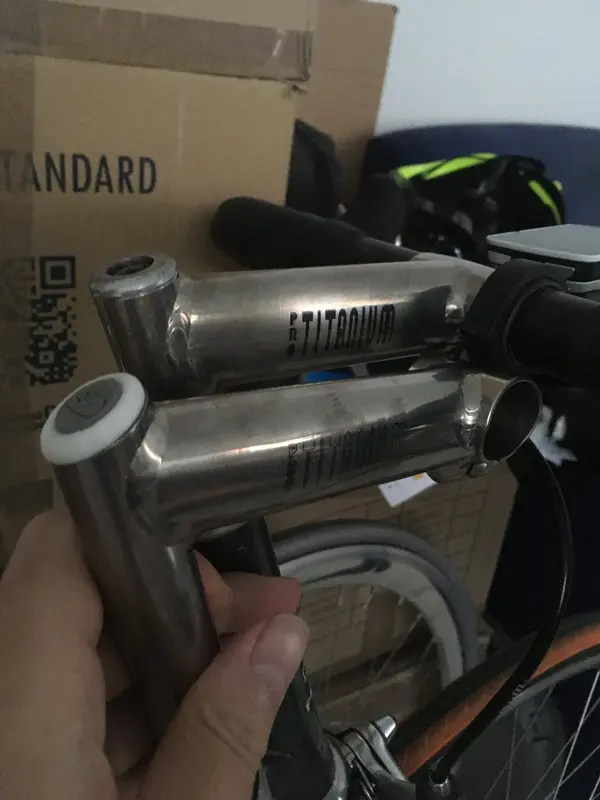
I recently got hold of this 1st generation 3TTT Titanium Pro quill stem quite cheap. The stem is in very good condition because it looks like the original bolt cap insert was cracked by being over tightened and it had been stored in a garage drawer for decades.
In the photo above, I'm comparing it with the final version of the stem fitted to my old Peugeot Perthus, the original titanium cap was replaced with a stronger 7075 -T6 aluminium insert, and the angled cut was changed to a straight cut.
The bolt in the early stem is made of 7075 Aluminium making it about 10 grams lighter than the later stem which has a titanium bolt.
The 1st gen stem weighs 188 grams compared to 198 grams for the later version. both stems are 115-120 mm.

I figured with my 3D skills I could model a replacement and get it CNC machined in 7075-T6 aluminium, the white part is 3D printed in PLA plastic and fits perfectly. I also created a bolt cover in flexible 3D printed grey TPU since I doubt the original can be found anywhere.
I modified the design slightly from the original with a bigger radius like the newer version and a fillet radius to reduce the stress raiser 90° angle under the brim of the original.

I have had a few replies from online quote machine shop websites. I was hoping to get it machined for £50 max. but I haven't received any quotes close to that yet, shipping usually doubles the price if the company is in China. The part is 22.2mm (diam) x 28.5 mm, so tiiny but I'm getting $50 dollar shipping quotes.

Is there is anyone here who can point me to someone who can CNC machine the part for a reasonable, cost?


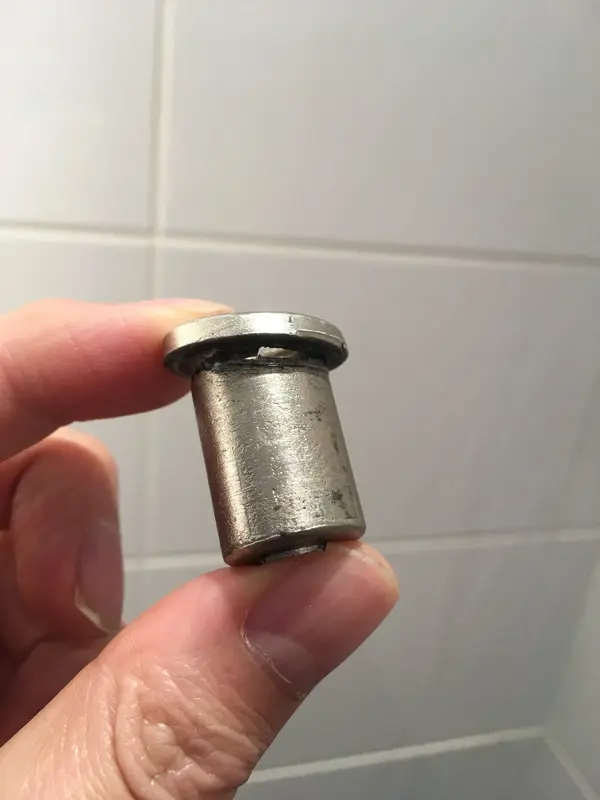
This is a close up showing the split titanium insert,there are probably loads of these stems stored in drawers around the world due to this design defect.

006.JPG
 
Last edited:
Hi SuperSid,

I created an account because I red about your plans for printing Shimano AX hoods. I am very curious about your experiences.
There's a Facebook group with AX-enthusiasts and there's a list of about 40 persons I think that are looking for some decent AX-hoods.

Will you update this forum page when you tried to print them?

Regards,

Gerwald
 
Rather than worrying about the stretch of the flexible filament you could split the hood down the centre and bond the 2 halves together. This won't stress the material. It would also be easier to 3d print as you would have a flat surface where the joint is, so it would sit on the print bed better.
 
Rather than worrying about the stretch of the flexible filament you could split the hood down the centre and bond the 2 halves together. This won't stress the material. It would also be easier to 3d print as you would have a flat surface where the joint is, so it would sit on the print bed better.
I'm not sure that splitting it into two halfs is the right approach with flexible filament, I'm not sure how to bond them together neatly and there would need to be supports printed underneath that are a pain to remove. With rigid components that would work perfectly, superglue is just as strong as printed layer bonds.

I have two rolls of 82A Recreus Filaflex TPU, in grey and black. My CR-10S 3D printer is getting old now but still produces excellent prints, I upgraded a few parts so that I can print carbon fibre reinforced nylon and flexible TPU but I don't have a direct drive gear system close to the printing head which is optimal for softer filaments. The flexible stuff I use is a bit more rigid and harder than most lever hood feel, my printer has to force it down a PETF Bowden tube without making the filament buckle, I need to really slow down the print speed but the finish can be excellent if the part can be printed without supports.

I won't be able to attempt it for a few months but it looks like I might have to use the scan to create a 3D model that I can modify. I might have to add some disposable parts designed to print the lever hoods at an optimal angle and then be cut off neatly. The problem with adding supports from the slicer program is they bond too well to the part and need to be snipped off which ends up looking messy.

TPU filament has really good layer adhesion, it is the least breakable material I've used so it should be strong enough to stretch over the levers and survive normal use. I have some naked 600 AX levers in a box, it would be good if 3D printing is successful. I'll keep you updated in this thread. I haven't asked the price for the 3D scan file, hopefully it's not outrageous.
 
Back
Top