Jonny69
Senior Retro Guru
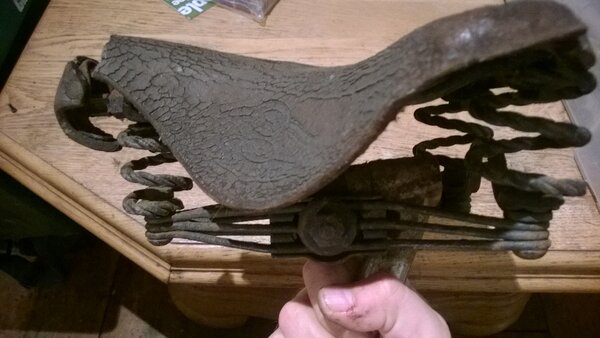
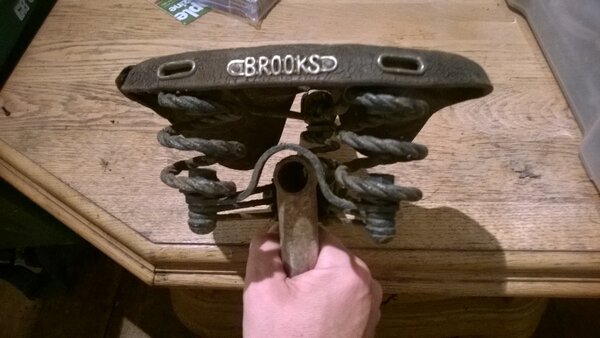
Occasionally on here we get asked about restoring Brooks saddles. They have to be pretty knackered to be past saving, so I thought I'd post some pictures and a guide for one I did a few weeks ago. This is a 1980's B66 Champion I found on a bike at the tip. It was dried out, really out of shape, couple of minor cracks and had a bit of moss on it, but generally looked ok. I thought it looked perfect as contender for a bit of experimental restoration work.
On closer inspection, the leather had completely dried out and was rock hard. The edges had curled up slightly where it had dried out and it looked like it had been outside for some time because there was a bit of moss on the surface which looked like it would scrub off. One spring at the back had a nut missing and the spring had jumped off the stud. The nose of the saddle was pointing fairly significantly off to one side, which I assumed was due to it shrinking more on one side than the other (which can also be caused by leaning the bike on one side of the saddle when it is wet), but underneath I could see that the front locating pin wasn't in its hole and was off to one side. The top was too tight and, as it was, the leather was too distorted to get the pin back in the hole.
So you can re-shape Brooks saddles by blocking them out. This involves soaking the saddle in the bath so the leather becomes soft and pliable, then you can chock it up into the desired shape and leave it to dry. Once it has dried out, it stays where you chocked it up. I needed to scrub mine with a scrubbing brush in soapy water to get the moss off, so I'd be soaking it through at the same time. I didn't want it pulling on the rivets when it got wet, so the first thing I did was backed the tension adjuster completely off so there was no tension and I stripped the springs off the back. Once the leather gets wet through, it really is soft and bendy like a thick chamois leather, so after few minutes of scrubbing it was soft enough that I could get the tension adjuster pin in place. When it was clean enough, I simply wound the adjuster forward to apply a little bit of tension, enough to get the top just taut, and secured the sides with a couple of carefully placed zip ties. You can see they are there just to hold it and they are not tight:


I left mine on some bubble wrap leather-side down for 24 hours, then flipped it over and left it a further 24 hours. It will open a little when you release it, so chock it up a little tighter than you intend the final shape to be.
The next stage is to nourish the leather. Do not use leather oil unless you want a soft floppy leather top on the saddle. You need to use a wax-based product like Brooks Proofide, dubbin or saddle soap. You can also use clear boot polish, but it doesn't get into the leather as effectively as the other three. Apply plenty to the top surface with a brush or cloth, allow it to dry and buff it to a shine with a cloth. Underneath, get an old toothbrush and literally work as much as you dare into the rough surface. The more you get on, the better, because it waterproofs the underside.
Personally, I've tried a couple of products for nourishing the leather. I used to use clear boot polish and it works quite well on newer saddles where the leather is in better condition but, as I mentioned above, it doesn't soak into the leather very far. I haven't tried Proofide yet, mainly put off by the price. My favourite is dubbin, because I think it has the best waterproofing protection. The downside with Dubbin is it takes a long time to dry and it won't shine up as well as wax polishes, but it lasts ages once it's on and the leather stays very supple.
In the pictures below I've tried a tin of traditional beeswax polish with natural turpentine. It soaked in well, top and bottom, and buffed up to a nice shine initially, but it has since dulled down and you can see the cracks again. I think because the leather was extremely dry on this saddle it's going to need something a bit more greasy, so I'll load on the dubbin.


Edit: pictures usually make things look better than they are, but this is actually shinier and less mouldy-looking in real life. It still needs a bit of work, but my pictures have made this look worse than it is!
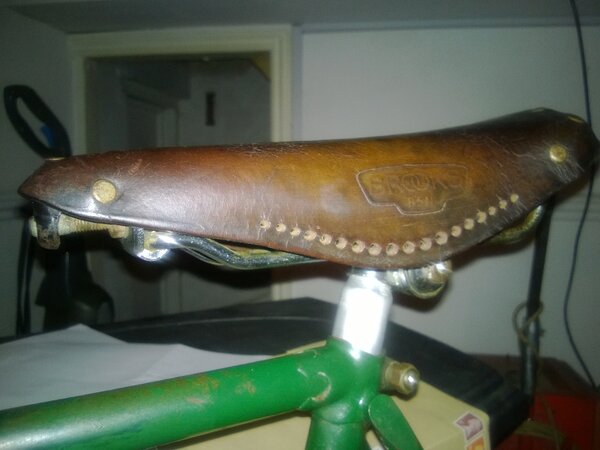
This is my previous Brooks, a B17 date stamped 1979. Again, it looked a bit rough when I got it and the nose was also bent on this one, but I backed off the tension and re-positioned the adjuster and gave it a thorough polishing and it was perfect to use on a retro ride. This is how it will shine up with Cherry Blossom clear boot polish:


Any more Brooks owners on here? What are your experiences with them?
On closer inspection, the leather had completely dried out and was rock hard. The edges had curled up slightly where it had dried out and it looked like it had been outside for some time because there was a bit of moss on the surface which looked like it would scrub off. One spring at the back had a nut missing and the spring had jumped off the stud. The nose of the saddle was pointing fairly significantly off to one side, which I assumed was due to it shrinking more on one side than the other (which can also be caused by leaning the bike on one side of the saddle when it is wet), but underneath I could see that the front locating pin wasn't in its hole and was off to one side. The top was too tight and, as it was, the leather was too distorted to get the pin back in the hole.
So you can re-shape Brooks saddles by blocking them out. This involves soaking the saddle in the bath so the leather becomes soft and pliable, then you can chock it up into the desired shape and leave it to dry. Once it has dried out, it stays where you chocked it up. I needed to scrub mine with a scrubbing brush in soapy water to get the moss off, so I'd be soaking it through at the same time. I didn't want it pulling on the rivets when it got wet, so the first thing I did was backed the tension adjuster completely off so there was no tension and I stripped the springs off the back. Once the leather gets wet through, it really is soft and bendy like a thick chamois leather, so after few minutes of scrubbing it was soft enough that I could get the tension adjuster pin in place. When it was clean enough, I simply wound the adjuster forward to apply a little bit of tension, enough to get the top just taut, and secured the sides with a couple of carefully placed zip ties. You can see they are there just to hold it and they are not tight:


I left mine on some bubble wrap leather-side down for 24 hours, then flipped it over and left it a further 24 hours. It will open a little when you release it, so chock it up a little tighter than you intend the final shape to be.
The next stage is to nourish the leather. Do not use leather oil unless you want a soft floppy leather top on the saddle. You need to use a wax-based product like Brooks Proofide, dubbin or saddle soap. You can also use clear boot polish, but it doesn't get into the leather as effectively as the other three. Apply plenty to the top surface with a brush or cloth, allow it to dry and buff it to a shine with a cloth. Underneath, get an old toothbrush and literally work as much as you dare into the rough surface. The more you get on, the better, because it waterproofs the underside.
Personally, I've tried a couple of products for nourishing the leather. I used to use clear boot polish and it works quite well on newer saddles where the leather is in better condition but, as I mentioned above, it doesn't soak into the leather very far. I haven't tried Proofide yet, mainly put off by the price. My favourite is dubbin, because I think it has the best waterproofing protection. The downside with Dubbin is it takes a long time to dry and it won't shine up as well as wax polishes, but it lasts ages once it's on and the leather stays very supple.
In the pictures below I've tried a tin of traditional beeswax polish with natural turpentine. It soaked in well, top and bottom, and buffed up to a nice shine initially, but it has since dulled down and you can see the cracks again. I think because the leather was extremely dry on this saddle it's going to need something a bit more greasy, so I'll load on the dubbin.


Edit: pictures usually make things look better than they are, but this is actually shinier and less mouldy-looking in real life. It still needs a bit of work, but my pictures have made this look worse than it is!
This is my previous Brooks, a B17 date stamped 1979. Again, it looked a bit rough when I got it and the nose was also bent on this one, but I backed off the tension and re-positioned the adjuster and gave it a thorough polishing and it was perfect to use on a retro ride. This is how it will shine up with Cherry Blossom clear boot polish:


Any more Brooks owners on here? What are your experiences with them?


