Dave Yates Frame Building Course

xxnick1975":2uy05bi2 said:
this is so cool, but looks like f'king hard work!

as I sit behind a desk all day, pausing occasionally for a meeting, a biscuit, a latte or a phone call, just the thought of bending and filing and sanding metal tubes brings me out in hives!

this must be reconnecting you with your inner caveman!

It is actually really hard, the days go quickly but the amount of concentration you have to put into it is massive. If it takes you 30 minutes to file a curved angle on a tube, the last thing you want to do is file too much and make something too short. That would be a real kick in the teeth.

I wear a fitbit which monitors all my activity and I'm amazed at how many steps and miles I've walked this week.

There are no chairs or stools in Dave's workshop so you are on your feet from 9AM till 5PM. The workshop is only the size of a large garage but you walk a lot from jig to vice!


Since 9AM on Monday morning, I've walked nearly 40,000 steps and nearly 20 miles building this frame!
 

Attachments

  • Fitbit.jpg
    Fitbit.jpg
    43.8 KB · Views: 658
I'm really please people are enjoying the updates :)

Day 4 has been busy to I'm having to spread this over 2 updates as Retrobike only allows me to upload a certain amount of pics at a time :-(

Today started with selecting braze on fittings


2 x brake cable stops
1 x gear cable stop
2 x gear lever bosses (I went for these so I could go retro if I wanted)
2 x pannier bosses
2 x sets of bottle bosses
1 x brake bridge
2 x extra bottle bosses to fit into the bridges to fasten mudguards (so that I don't need to use clips)
1 x front mech braze on hanger

Most of the fittings are silver soldered instead of brass. The lugs are brazed purely for cost. A length of brass is 25p, a much shorter length of silver is several £s. Because the area of the tubes to hold the fittings are really thin, silver is used as it has a much lower melting point so less heat!

We had a good chat about 753 frames and silver solder and the certification process. He talked about how the flux for silver solder sucks up a huge amount of moisture so if you aren't careful with it, you would get corrosion. He has seen loads of 753 top tubes that have corroded underneath as the excess solder has collected at the bottom of the tube and the moisture in the solder has just sat and rusted the tube. I think he has seen just about every type of frame problem!

First up was bottle bosses - on down tube and seat tube - a jig to mark holes and then a few minutes later the bosses are fitted.


Next up were cable stops; positioning the frame in the vice and a simple weight was all that is needed to hold the stop in place during soldering. 2 brake cable stops on the left underneath of the top tube and a gear cable stop under the chainstay.


I decided to have a braze on front mech. Dave has a huge amount of knowledge so if you tell him the max chainring you will use, he will tell you the precise measurement to us for positioning the fitting. For me it was 120mm from the top of the BB shell to the centre of the fitting. I simple clamp held it in place while it was soldered.


Gear lever bosses were next. I didn't just want cable stops on the down tube. I wanted to have the option of fitting down tube levers if I wanted to fit retro kit to this frame. The jig for the stops threads into them and holds them in place.


Next up was sorting out the excess tube on the seat tube/lug and cutting the slot in the rear of the seat tube. A small hole is drilled and the hacksaw is used to roughly cut the slot before filing everything! I made a small mark on the tip of the front of the seat lug with the saw but Dave got the torch and brass and fixed the tip perfectly :)


I really like the seat lug and seat stay caps on this frame!

Going to have to do another post now to continue...
 

Attachments

  • Dave Yates Frame Building Course Day 4 Start.jpg
    Dave Yates Frame Building Course Day 4 Start.jpg
    91.7 KB · Views: 625
  • Dave Yates Frame Building Course Day 4 Silver Solder Bottle Bosses.jpg
    Dave Yates Frame Building Course Day 4 Silver Solder Bottle Bosses.jpg
    100.7 KB · Views: 625
  • Dave Yates Frame Building Course Day 4 Silver Solder Cable Stops.jpg
    Dave Yates Frame Building Course Day 4 Silver Solder Cable Stops.jpg
    91 KB · Views: 625
  • Dave Yates Frame Building Course Day 4 Silver Solder Front Mech Braze On.jpg
    Dave Yates Frame Building Course Day 4 Silver Solder Front Mech Braze On.jpg
    99.2 KB · Views: 625
  • Dave Yates Frame Building Course Day 4 Silver Solder Gear Lever Bosses.jpg
    Dave Yates Frame Building Course Day 4 Silver Solder Gear Lever Bosses.jpg
    96.1 KB · Views: 625
  • Dave Yates Frame Building Course Day 4 Startting to Form the Seat Fastening.jpg
    Dave Yates Frame Building Course Day 4 Startting to Form the Seat Fastening.jpg
    72.8 KB · Views: 625
  • Dave Yates Frame Building Course Day 4 Seat Tube Lug Finished.jpg
    Dave Yates Frame Building Course Day 4 Seat Tube Lug Finished.jpg
    81.6 KB · Views: 625
Day 4 continued...

Brake bridge was next. Because this is a custom frame, Dave suggested drilling underneath the bridge and soldering a water bottle boss to hold the mudguard instead of using a clip - why not I thought, I'm making this so lets do it! The bridge comes with the brake countersink fitted but has to be cut to length and filed and shaped to fit into the stays.

It has to fit at a precise location to ensure the brake caliper will fit in the centre of the frame, be at the correct height for brake drop and give clearance for guards. This took about an hour to make.


The bridge is brazed to the stays and then the bottle boss is cut short to not foul the brake bolt then silver soldered into place.


The chain stays also needed a bridge but these are made, not supplied as standard. Dave gave me a 15cm length offcut of seat stay tube. He measured and told me where it was to fit and said get on with it!

This was also going to be fitted with a bottle boss fitting to fasten the bottom of the mudguard. 30 minutes of cutting, filing and checking and it was sorted. Brazed into place and then the bottle boss soldered in.


While that was cooling, I had a look around. I could easily just live in this workshop. Everything is to hand and everything has a use!


Last thing to do today was the pannier rack bosses at the top of the seat stays. Yet another fixture holds the bosses at exactly the correct height. This workshop has every conceivable fixture, mostly all fashioned by Dave over the years. We have used his Mark 3 jig. His mark 2 jig is sitting behind a machine and his mark 1 jig is now used by another frame builder.

He uses the lathe for cutting fork threads, and even with digital calipers and an electronically controlled cutting bit in the lathe, he still uses a steel Campagnolo Record cup to check the fit of the thread!

Pannier bosses are brazed in place. Brazing onto the thin seat stays doesn't take much heat. He will tell you exactly how to create a hot flame or soft flame and how to control the oxygen and acetylene mixture.


That was all the work for today. He is going to shot blast the frame and forks tonight and that will highlight what is left to clean and file tomorrow. He even went into his collection of frame transfers and brought out all his remaining DENTON transfers and just gave them to me :)


I would seriously recommend this course to everyone. He only runs a few each year and there are only 2 spaces on each one so it is tough to get a place. I waited 3 years for this and have loved every minute of the very hard work!

The last day is tomorrow, it is only till lunch time. Enough time to face the head tube, face and tap the BB and ream the seat tube with whatever other finishing is needed.

Cheers
Neil
 

Attachments

  • Dave Yates Frame Building Course Day 4 Starting the Brake Bridge.jpg
    Dave Yates Frame Building Course Day 4 Starting the Brake Bridge.jpg
    96.6 KB · Views: 618
  • Dave Yates Frame Building Course Day 4 Brake Bridge Fitted.jpg
    Dave Yates Frame Building Course Day 4 Brake Bridge Fitted.jpg
    67.3 KB · Views: 618
  • Dave Yates Frame Building Course Day 4 Making a Chainstay Bridge.jpg
    Dave Yates Frame Building Course Day 4 Making a Chainstay Bridge.jpg
    111 KB · Views: 618
  • Dave Yates Frame Building Course Day 4 A Look Around Daves Workshop.jpg
    Dave Yates Frame Building Course Day 4 A Look Around Daves Workshop.jpg
    106.3 KB · Views: 618
  • Dave Yates Frame Building Course Day 4 Pannier Bosses.jpg
    Dave Yates Frame Building Course Day 4 Pannier Bosses.jpg
    107.2 KB · Views: 618
  • Dave Yates Frame Building Course Day 4 A Free Selection of Denton Transfers.jpg
    Dave Yates Frame Building Course Day 4 A Free Selection of Denton Transfers.jpg
    87.8 KB · Views: 618
Final day today, well, half day as the course finishes at 1PM.

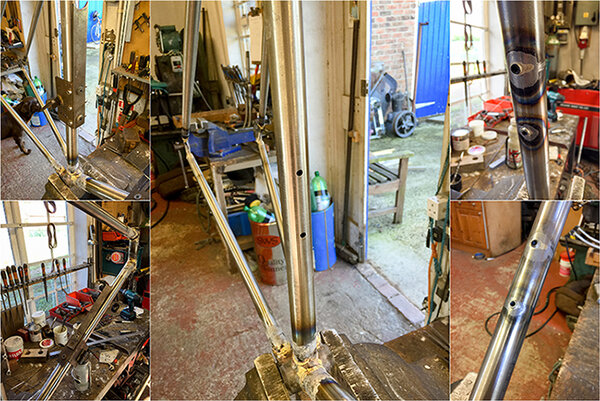
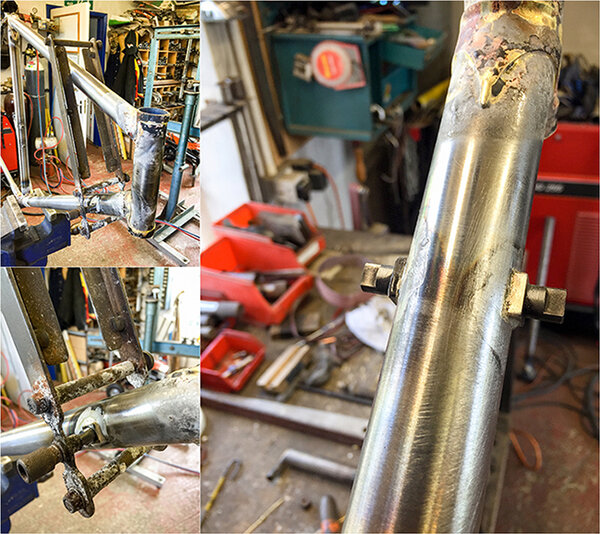
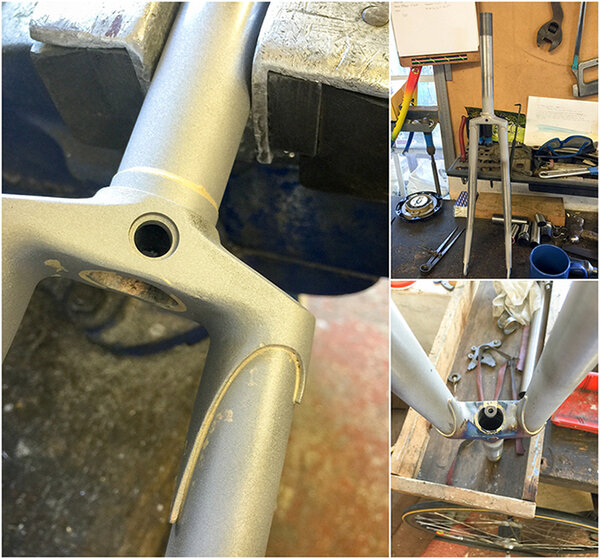
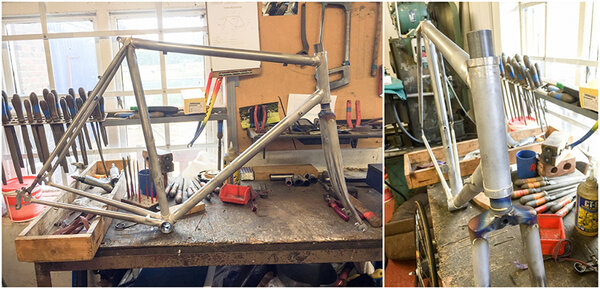
Started with a shot blasted frame and forks. Actually really happy with how the brazing and lug lines have worked out. For my first attempt with the torch, it wasn't too sloppy. We fitted a dropout mudguard boss to the underneath of the crown for a mudguard fastening!


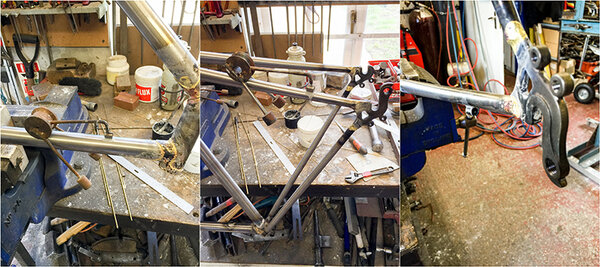
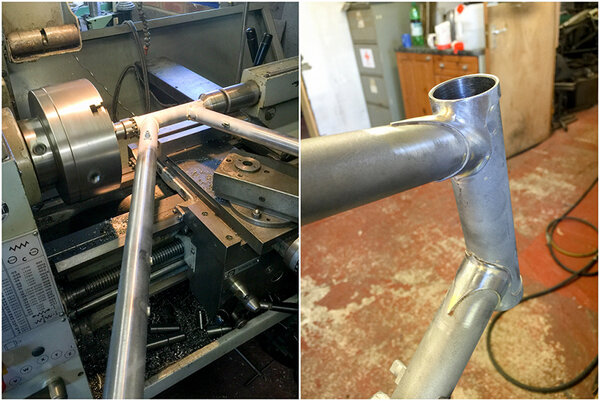
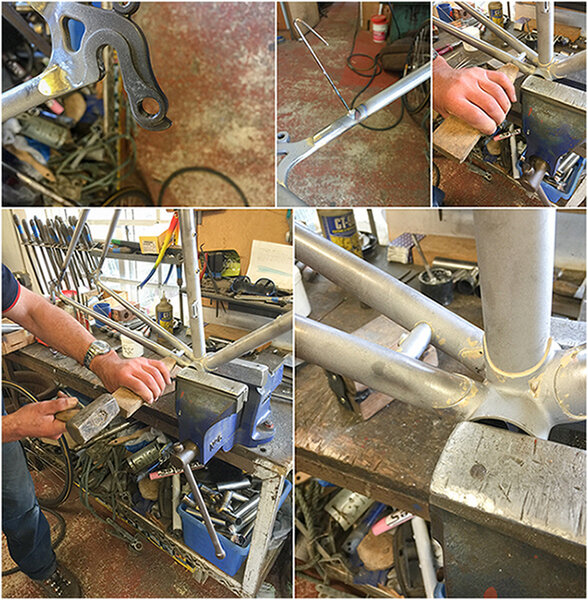
Next job was to file and clean the head lugs and face the head tube. Frame held securely in the hands and faced with a cutting tool in the lathe.


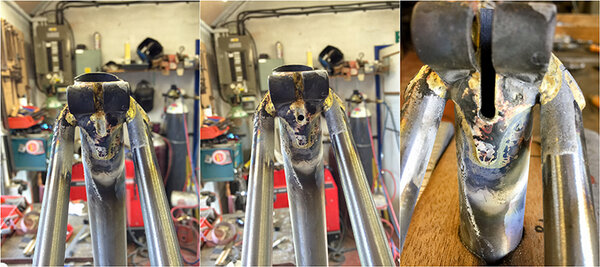
The seat lug gets brazed a few times with top tube, seat tube and seat stays so it was easy for me to cover it in brass that shouldn't have been there. It does file off but just takes time :-(


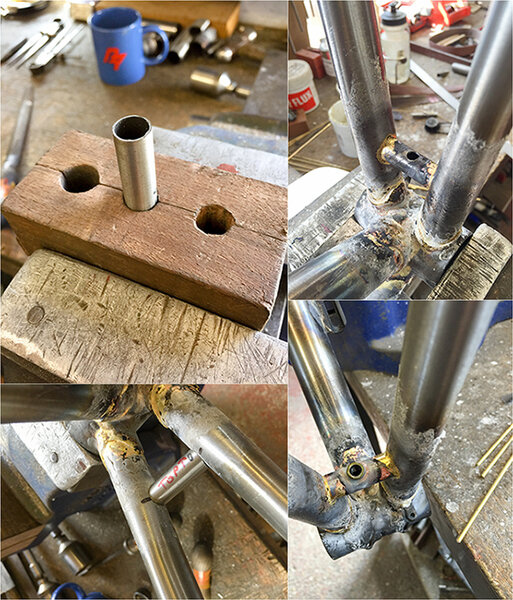
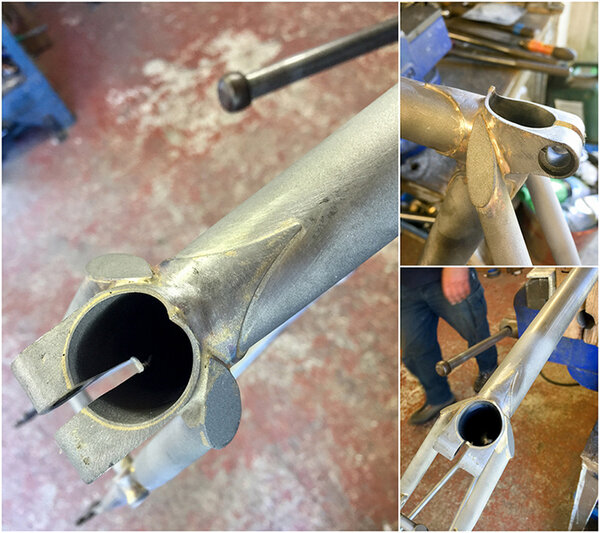
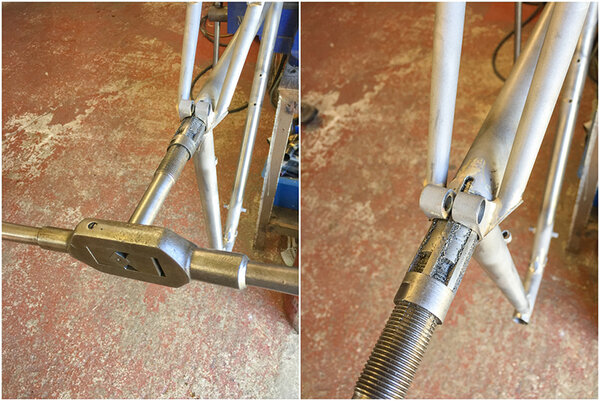
Another job to do with the seat tube is ream it. The 631 seat tube takes a 27.2 pin. The reamer isn't just removing any snots of brass, it is removing any distortions from the tube that might have formed during heating. A 27.2 fitted in perfectly after reaming.


Finally a few finishing touches...

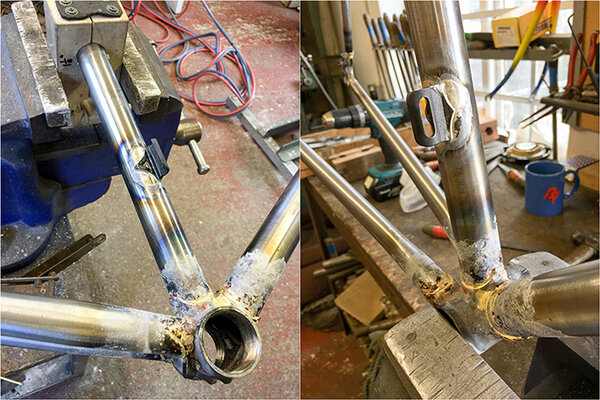
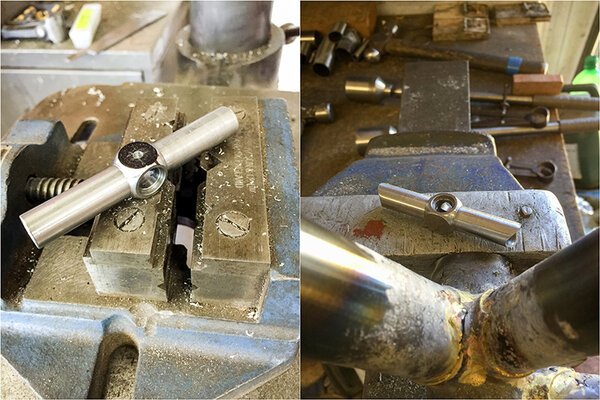
The inside of the seat and chain stay on the block side is chamfered with a file to allow the bottom sprocket to slide in and out during a wheel change. Dave also has a shaped block of wood and big mallet for fitting chainstay dimples for the inner chain ring clearance. It works perfectly, one big hit and it's done!

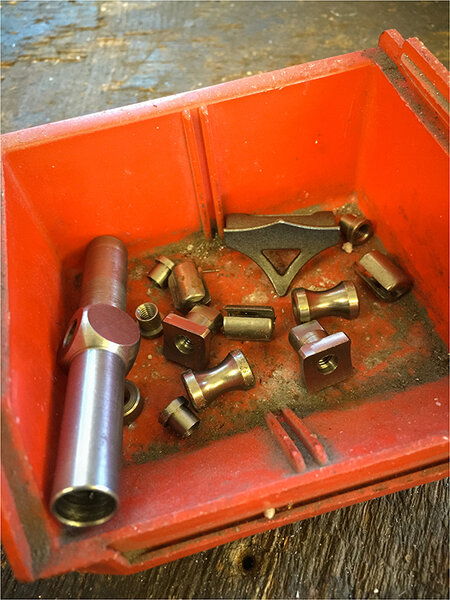
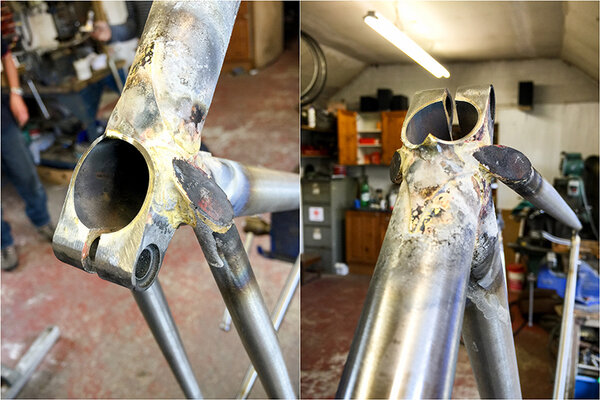
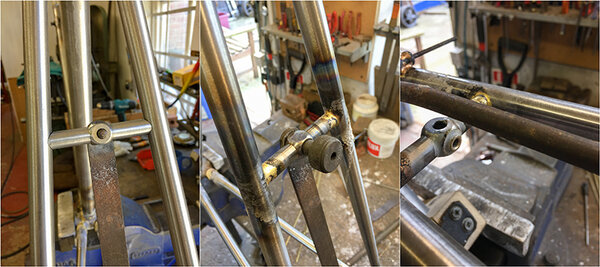
During the brazing, we drilled breather holes in both fork blades, the top tube and both seat stays; these are closed up to stop water getting into the tubes. The only hole in this frame is the cut out under the BB. A welding rod is fluxed and placed in the hole and then heated and silver soldered. The rod is cut off and filed smooth.


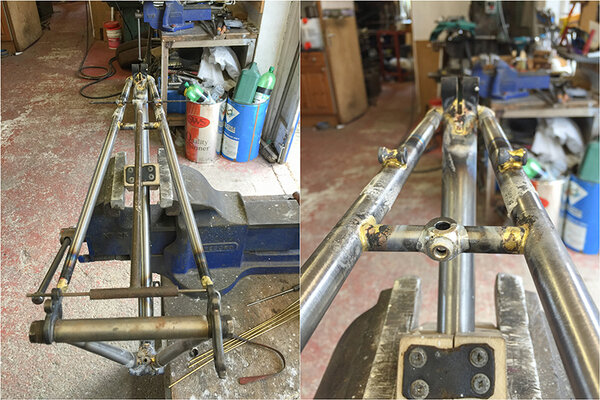
Finally my 4 and a half day course was over and I had a complete frame and forks :) Dave will blast it again and paint it then post it out to me. Unfortunately, I have to wait till sometime in October :-(


I've taken the opportunity to ask Dave all sorts of questions this week. He is very open and answers everything. I have a lot of 753 frames so asked him specifically about 753.

Dave said that 753 certification started with having to build a full frame, (this later changed to just a BB shell seat tube cut off and chainstay cut offs). The full frame was sent back to Reynolds who stress tested it. His first frame received the highest stress figure that Reynolds recorded - so he knows his stuff about 753!

So he said, never chrome 753! Any frame saying it is 753 and has chrome, will, at some point fail. Even chrome dropouts as the tube also receives the chrome and is then painted over to leave the chrome dropout.

Never try to cold set 753, it will snap, at some point.

You can repair 753 but cannot re-track it. Replacing tubes is fine but they need to be put back in while holding the frame in track.

Never spring a 753 frame to take a 130 rear wheel, it will snap at some point. Springing any frame, not just 753, pulls the dropouts out of parallel alignment, fastening the wheel QR then pulls them back in, putting stress on the chain stay bridge and dropout itself. Most failed across the dropout.

He also built, while at M.Steels in Gosforth, a vast amount of frames for other manufacturers and many for Condor. He built the road and track Condor frames for Bradley Wiggins in the early 90s.

He knows other builders inside out and knows how they usually fail - Mercians will often fail across the down tube at the top of the tube just at the butt of the tube. He has examples of other frames and forks around the workshop that he has cut up and they have no brass in them. He has a pair of Lemond forks that have no brass in the crown/steerer joint. It is scary what people are riding around on :-(

My particular fave frame is SBDU. He also had an SBDU frame in a repair, a seized seatpin, with the pin in the vice, he twisted the frame and the seat lug snapped off the frame as there was very little brass holding it to the seat tube.

So not every builder is without issues.

There was loads more about aluminum, titanium, tig welding, his views on fillet brazing. He also makes knife blades and gun stocks and has also made gun silencers out of titanium seat tubes!

Anyway, I'll probably have to leave this thread until I get my painted frame back. Best week I've spent for a long long time :)

Cheers
Neil
 

Attachments

  • Dave Yates Frame Building Course Day 5 Forks Shotblasted.jpg
    Dave Yates Frame Building Course Day 5 Forks Shotblasted.jpg
    96.4 KB · Views: 588
  • Dave Yates Frame Building Course Day 5 Facing and Cleaning Head Lugs.jpg
    Dave Yates Frame Building Course Day 5 Facing and Cleaning Head Lugs.jpg
    86.7 KB · Views: 588
  • Dave Yates Frame Building Course Day 5 Cleaning Seat Lug Brazing.jpg
    Dave Yates Frame Building Course Day 5 Cleaning Seat Lug Brazing.jpg
    88.2 KB · Views: 588
  • Dave Yates Frame Building Course Day 5 Reaming Seat Tube.jpg
    Dave Yates Frame Building Course Day 5 Reaming Seat Tube.jpg
    97.7 KB · Views: 588
  • Dave Yates Frame Building Course Day 5 A Few Finishing Touches.jpg
    Dave Yates Frame Building Course Day 5 A Few Finishing Touches.jpg
    109.5 KB · Views: 588
  • Dave Yates Frame Building Course Day 5 My Frame and Forks.jpg
    Dave Yates Frame Building Course Day 5 My Frame and Forks.jpg
    83.1 KB · Views: 588
Re:

Wow, just spent the afternoon looking up the price of gas brazing kits etc. Real Walter Mitty fantasy, if only I had the time I'd love to have a go at frame building.
 
Wow what an experience and thread very jealous. I read about this and one day I will get around to doing it.

Its the ultimate in my book to have a frame you made yourself not just a bike you built.

Has got me worried about my pug 753 with chrome rear stays and chrome forks under the paint :( .... best be careful with it.
 
Back
Top